Ever wondered how something as simple as mixing Vaseline with lemon could transform your skincare routine? The combination of these two humble ingredients can deliver surprising results! Whether you want to lighten dark spots, hydrate dry skin, or even reduce wrinkles, this mixture can be a game-changer for many common skin problems.
So, what exactly makes this combo so powerful? Let’s dive into the details of how mixing Vaseline and lemon can work wonders on your skin.
The Power of Vaseline: A Skincare Essential
Vaseline, also known as petroleum jelly, has been a staple in skincare for decades. Its primary role is to act as a moisture barrier, sealing in hydration and protecting the skin from external elements like cold weather or pollutants. It’s particularly effective for dry, cracked skin and has a soothing effect that helps in healing damaged skin.
Lemon: A Citrus Marvel for Skin
Lemon is a citrus fruit packed with vitamin C, antioxidants, and natural acids. These properties make it excellent for skin brightening, exfoliation, and fighting signs of aging. The high vitamin C content boosts collagen production, which is essential for firm and youthful-looking skin. Additionally, the citric acid in lemon helps to gently exfoliate dead skin cells, revealing a fresher, glowing complexion.
Facial sweating can be an uncomfortable and embarrassing issue for many people. It not only affects one’s confidence but can also hinder daily activities. Here, we provide seven effective tips to combat facial sweating, ensuring you regain control and feel comfortable in your skin.
1. Maintain Optimal Hygiene
Maintaining proper facial hygiene is crucial in managing facial sweating. Use a mild, non-comedogenic cleanser twice a day to wash your face to get rid of extra oil, grime, and perspiration. Exfoliating regularly helps to unclog pores and reduce the buildup of sweat and bacteria. Ensure to use lukewarm water as hot water can exacerbate sweating by increasing your body temperature.
2. Use Antiperspirants
Many people overlook the use of antiperspirants on their face, which can be an effective solution for facial sweating. Look for antiperspirants that are safe for facial use, preferably those that contain aluminum chloride. Apply the antiperspirant at night to clean, dry skin to allow it to work overnight, reducing sweat production the next day.
3. Stay Hydrated
Hydration plays a vital role in regulating body temperature and sweat production. Drinking enough water throughout the day helps to keep your body cool and reduces the likelihood of excessive sweating. Aim for at least eight glasses of water every day. Additionally, incorporating hydrating foods such as fruits and vegetables can further aid in maintaining optimal hydration levels.
4. Adjust Your Diet
Your diet can significantly impact your sweating patterns. Alcohol, caffeine, and spicy meals are known to cause perspiration. To manage facial sweating, consider reducing your intake of these triggers. Instead, focus on a diet rich in whole grains, lean proteins, and fresh produce, which promote overall health and can help in regulating sweat production.
5. Manage Stress and Anxiety
Stress and anxiety are common triggers for excessive sweating, including on the face. Engaging in relaxation techniques such as deep breathing exercises, yoga, and meditation can help manage stress levels. Incorporating regular physical activity also aids in stress reduction and promotes overall well-being, indirectly reducing the frequency and intensity of sweating episodes.
6. Wear Breathable Fabrics
Choosing the right clothing can make a significant difference in managing facial sweating. Opt for breathable, natural fabrics such as cotton or linen, which allow your skin to breathe and prevent overheating. Avoid synthetic materials that can trap heat and exacerbate sweating. Additionally, wearing light-colored clothing can help reflect heat and keep you cooler.
7. Consider Medical Treatments
For those who struggle with severe facial sweating that is not alleviated by lifestyle changes, medical treatments may be necessary. Options include:
Botox Injections: Botox can temporarily block the nerves that trigger sweat glands, reducing sweating for several months.
Prescription Antiperspirants: Stronger than over-the-counter options, these can be prescribed by a dermatologist.
Iontophoresis: A technique that lowers perspiration by applying electrical currents.
Oral Medications: Certain medications can help reduce sweating by blocking chemical signals in the body.
Consult with a healthcare professional to determine the most appropriate treatment based on your specific condition and medical history.
By implementing these seven tips, you can effectively manage facial sweating and improve your overall comfort and confidence.
As pet owners, we deeply cherish our furry companions, and their health is our top priority. Recognizing the early warning signs of cancer in dogs is crucial in ensuring timely intervention and treatment. Cancer in dogs can manifest in various ways, and understanding these signs can make a significant difference in your dog’s life. In this comprehensive article, we will delve into the seven early warning signs of cancer in dogs, helping you stay vigilant and proactive in maintaining your pet’s health.
1. Unusual Lumps and Bumps
One of the most common early signs of cancer in dogs is the presence of unusual lumps and bumps. While not all lumps are cancerous, any new or changing growths should be examined by a veterinarian. Regularly running your hands over your dog’s body during grooming sessions can help you detect any abnormalities early.
Key Points to Consider:
Size and Shape: Note any changes in the size, shape, or texture of lumps. Rapid growth or irregular shapes warrant immediate attention.
Location: Be aware of where lumps are found. Some areas may be more prone to benign growths, while others might be more concerning.
Pain and Sensitivity: Lumps that cause your dog pain or discomfort when touched should be checked by a vet without delay.
2. Unexplained Weight Loss
Sudden or unexplained weight loss is a significant red flag for potential health issues, including cancer. If your dog is losing weight despite maintaining a healthy diet and exercise routine, it could indicate an underlying problem.
Key Points to Consider:
Appetite Changes: Monitor your dog’s eating habits. A decrease in appetite or difficulty eating can be a symptom of oral tumors or gastrointestinal cancers.
Muscle Wasting: Noticeable muscle loss, particularly around the hindquarters, can be indicative of systemic illness.
Energy Levels: A dog with cancer may exhibit decreased energy levels and lethargy, which can accompany weight loss.
3. Persistent Coughing or Difficulty Breathing
Persistent coughing or difficulty breathing can be a sign of lung cancer or other respiratory issues. While occasional coughing can be due to benign causes like allergies or infections, chronic coughing requires veterinary evaluation.
Key Points to Consider:
Cough Characteristics: Pay attention to the nature of the cough. A dry, hacking cough can be different from a moist, productive one.
Breathing Patterns: Observe your dog’s breathing. Labored or rapid breathing, wheezing, or shortness of breath are concerning signs.
Associated Symptoms: Look for other symptoms like nasal discharge, sneezing, or coughing up blood, which may indicate more severe issues.
4. Non-Healing Wounds or Sores
Non-healing wounds or sores that persist for more than a few weeks can be an indicator of skin cancer or other malignancies. Healthy dogs typically heal quickly, so prolonged healing times are a cause for concern.
Key Points to Consider:
Appearance: Inspect the wound’s appearance. Changes in color, texture, or size of a sore can signal malignancy.
Pain and Discomfort: A wound that causes your dog pain, irritation, or excessive licking requires prompt veterinary attention.
Location: Sores located on areas like the mouth, nose, or paws can be particularly indicative of cancerous growths.
5. Difficulty Eating or Swallowing
Difficulty eating or swallowing can point to cancers in the mouth, throat, or esophagus. If your dog is experiencing pain while eating, drooling excessively, or has visible growths in the mouth, it’s essential to seek veterinary care.
Key Points to Consider:
Oral Examination: Regularly check your dog’s mouth for unusual growths, sores, or changes in gum color.
Drooling and Bad Breath: Excessive drooling, foul breath, or blood-tinged saliva can be signs of oral cancer.
Feeding Behavior: Watch for changes in how your dog eats, such as favoring one side of the mouth, dropping food, or avoiding hard kibble.
6. Changes in Bathroom Habits
Changes in bathroom habits, including both urination and defecation, can be early indicators of cancer affecting the urinary tract, digestive system, or reproductive organs.
Key Points to Consider:
Frequency and Urgency: Increased frequency, straining, or urgency in urination can signal bladder cancer or other urinary issues.
Stool Appearance: Monitor changes in stool consistency, color, and presence of blood. Diarrhea or constipation can be symptoms of gastrointestinal cancer.
Behavioral Changes: Pay attention to signs of discomfort during elimination, such as whimpering or changes in posture.
7. Behavioral Changes and Lethargy
Behavioral changes and lethargy can be subtle but significant indicators of underlying health problems, including cancer. A normally active and playful dog that becomes withdrawn or lethargic may be experiencing pain or discomfort.
Key Points to Consider:
Activity Levels: Note any decline in your dog’s interest in play, walks, or interaction with family members.
Mood and Temperament: Changes in mood, such as increased irritability, aggression, or anxiety, can be signs of distress.
Sleep Patterns: Alterations in sleep patterns, such as excessive sleeping or restlessness, should not be overlooked.
Conclusion
Being aware of these early warning signs of cancer in dogs can help you take swift action and seek veterinary care when needed. Regular check-ups, a balanced diet, and a keen observation of your pet’s behavior and physical condition are essential in maintaining their health and well-being. Early detection and intervention can make a significant difference in the treatment and prognosis of canine cancer.
Unwanted hair can be a persistent issue for many individuals, leading to a constant search for effective removal methods. While professional treatments are available, they can often be costly and time-consuming. Fortunately, there are several DIY techniques that can help you achieve permanent hair removal at home. In this comprehensive guide, we will explore various methods, their benefits, and step-by-step instructions to help you get smooth, hair-free skin.
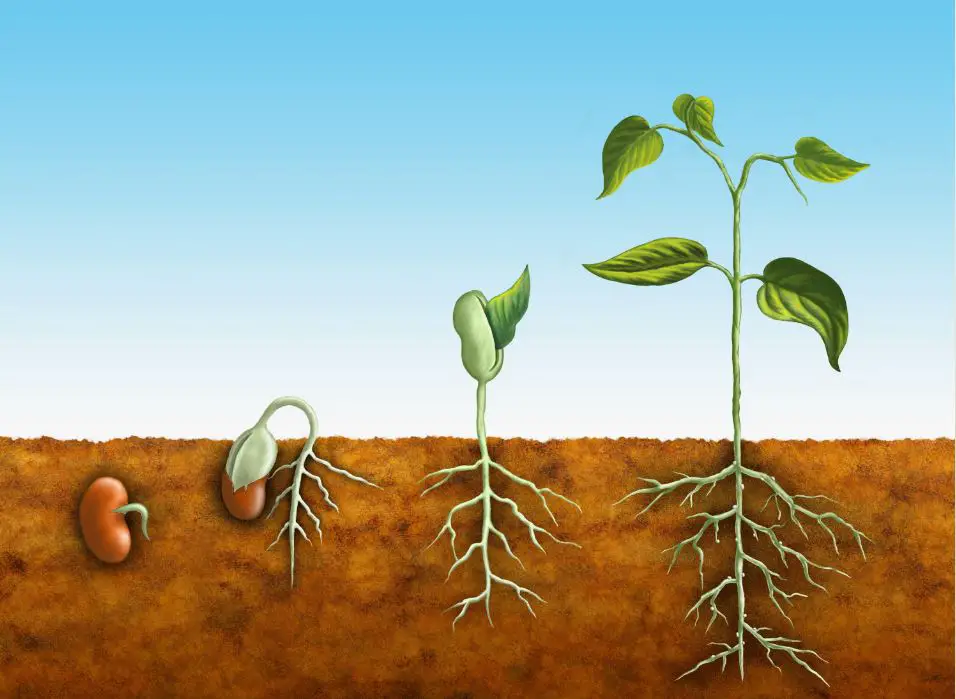
Understanding Hair Growth
Before diving into DIY hair removal methods, it’s essential to understand how hair growth works. There are three phases of hair development: the anagen (growing), catagen (transitional), and telogen (resting). Effective hair removal targets the anagen phase, when the hair is actively growing and most susceptible to treatments.
DIY Sugar Waxing
Sugar waxing, or sugaring, is a natural and effective method for removing unwanted hair. It calls for the use of a paste consisting of water, sugar, and lemon juice.
Ingredients:
2 cups of sugar
1/4 cup of lemon juice
1/4 cup of water
Instructions:
Mix the Ingredients: Combine the sugar, lemon juice, and water in a saucepan.
Heat the Mixture: Cook the mixture over medium heat, stirring constantly until it turns a golden-brown color.
Cool the Paste: Allow the mixture to cool until it is warm to the touch but not hot.
Apply the Paste: Spread the paste onto the skin in the direction of hair growth.
Remove the Hair: Place a strip of cloth over the paste and quickly pull it off in the opposite direction of hair growth.
Benefits:
Natural ingredients don’t cause unpleasant side effects on the skin.
Effective: Longer-lasting benefits are achieved by removing hair at the root.
DIY Turmeric and Milk Paste
Turmeric is known for its anti-inflammatory properties and has been used for centuries for various skin treatments. Combined with milk, it can help in reducing hair growth over time.
Ingredients:
1/2 cup of turmeric powder
1/2 cup of milk
Instructions:
Prepare the Paste: Mix the turmeric powder and milk to form a thick paste.
Apply to Skin: Apply the paste to the area with unwanted hair.
Let It Dry: Allow the paste to dry completely on your skin.
Remove the Paste: Scrub the paste off gently with a washcloth and warm water.
Benefits:
Natural and Gentle: Suitable for sensitive skin.
Gradual Reduction: Helps in reducing hair growth over time with consistent use.
DIY Papaya and Turmeric Paste
An enzyme called papain found in papayas has the ability to damage hair follicles and prevent new hair development. Combined with turmeric, it can be an effective hair removal treatment.
Ingredients:
1 raw papaya
1/2 teaspoon of turmeric powder
Instructions:
Prepare the Papaya: Peel and mash the raw papaya into a fine paste.
Mix with Turmeric: Add the turmeric powder to the papaya paste and mix well.
Apply to Skin: Apply the paste to the unwanted hair area.
Massage and Let Sit: Gently massage the mixture into the skin and leave it on for 20 minutes.
Rinse Off: Rinse off with warm water.
Benefits:
Enzyme Action: Papain helps in breaking down hair follicles.
Natural Ingredients: Free of adverse effects and safe for frequent usage.
DIY Egg Mask
An egg mask can help in removing facial hair effectively. The sticky nature of the egg white can pull out hair when peeled off.
Ingredients:
1 egg white
1 tablespoon of sugar
1/2 tablespoon of cornstarch
Instructions:
Prepare the Mask: Mix the egg white, sugar, and cornstarch to form a smooth paste.
Apply to Skin: Apply the mixture to the area with unwanted hair.
Let It Dry: Give the mask time to fully dry.
Peel Off: Peel off the mask in the opposite direction of hair growth.
Benefits:
Effective for Fine Hair: Works well on fine facial hair.
Natural and Easy: Simple ingredients that are easy to find.
DIY Gelatin Peel-Off Mask
Gelatin masks can effectively remove hair and blackheads, leaving the skin smooth and clear.
Ingredients:
1 tablespoon of unflavored gelatin
2 tablespoons of milk
A few drops of essential oil (optional)
Instructions:
Prepare the Mask: Mix the gelatin and milk in a bowl.
Heat the Mixture: Microwave the mixture for 10-15 seconds until it becomes warm and smooth.
Apply to Skin: Apply the mask to the unwanted hair area.
Let It Dry: Give the mask time to fully dry.
Peel Off: Peel off the mask in the opposite direction of hair growth.
Benefits:
Effective: Removes hair and cleanses the skin.
Customizable: Essential oils can be added for additional skin benefits.
Tips for Effective DIY Hair Removal
Exfoliate Regularly: Exfoliating your skin before applying any hair removal method helps in removing dead skin cells and allows for better hair removal.
Moisturize: After hair removal, moisturize your skin to soothe and hydrate it.
Consistency: Regular use of these methods can lead to more permanent results over time.
Patch Test: Always perform a patch test to check for any allergic reactions before applying any DIY method to a larger area.
Conclusion
Removing unwanted hair permanently at home is achievable with the right DIY methods. By using natural ingredients and following these detailed instructions, you can enjoy smooth, hair-free skin without the need for expensive salon treatments. Remember to be consistent and patient, as natural methods may take some time to show significant results.
Water retention, also known as edema, occurs when excess fluids build up inside your body. It can cause swelling in various parts of the body, including the legs, feet, ankles, and hands. Understanding the causes of water retention is crucial because it can affect your health and daily comfort. Let’s dive into the six main causes of water retention and explore effective ways to reverse it.
Cause 1: High Sodium Intake
Sodium is an essential mineral that helps maintain fluid balance in your body.However, excessive sodium intake can cause water retention. When you eat a lot of salty foods, your body holds onto extra water to dilute the excess sodium, leading to swelling and bloating. This is why reducing your sodium intake is a key step in managing water retention.
Cause 2: Hormonal Changes
Hormonal fluctuations, particularly in women, can cause water retention. Many women experience bloating and swelling during their menstrual cycle due to hormonal changes. Additionally, hormonal imbalances, such as those seen in conditions like polycystic ovary syndrome (PCOS), can also lead to water retention. Understanding these hormonal triggers can help in managing the symptoms.
When you plant four bananas in your garden, the results might surprise you. Discover the secrets to nurturing these tropical fruits and achieving a bountiful harvest.
Preparing Your Garden for Banana Planting
Preparing the Soil for Optimal Growth
Before you start planting your bananas, it’s crucial to prepare the soil properly. Bananas thrive in well-draining soil with a pH level between 5.5 and 7.0. Guarantee the soil’s richness in organic matter by incorporating compost or aged manure. This will supply vital nutrients for robust growth.
Selecting the Perfect Location
Bananas require plenty of sunlight to flourish. Choose a location in your garden that receives at least six to eight hours of sunlight daily. Additionally, ensure the area is sheltered from strong winds, as bananas have shallow root systems that can easily be damaged.
Planting Your Banana Trees
Choosing the Right Varieties
When selecting banana varieties for your garden, consider your climate and available space. Some popular options include Cavendish, Dwarf Lady Finger, and Grand Nain. Choose a variety that is well-suited to your region and fits the size of your garden.
Planting Depth and Spacing
Excavate a hole that is double the width and equal in depth to the root ball of your banana plant. Gently remove the plant from its container and place it in the hole, ensuring the soil level matches that of the surrounding ground. Space your banana plants approximately 5 to 10 feet apart, depending on the variety.
Caring for Your Banana Plants
Watering
Bananas require consistent moisture to thrive. Ensure your plants receive regular watering, maintaining soil moisture consistently without becoming waterlogged. During hot, dry periods, increase watering frequency to prevent dehydration.
Fertilizing
Feed your banana plants with a balanced fertilizer every 2-3 months during the growing season. Look for a fertilizer specifically formulated for fruiting plants, and follow the manufacturer’s instructions for application rates.
Pruning
Regular pruning is essential to keep your banana plants healthy and productive. Remove any dead or damaged leaves, as well as any suckers that emerge around the base of the plant. This will help direct energy towards fruit production.
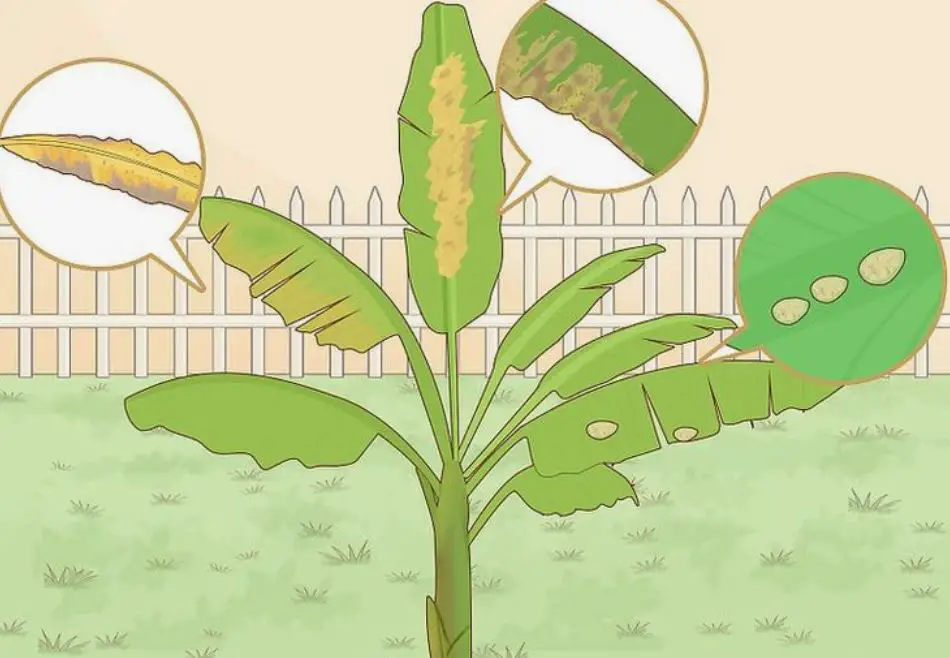
Protecting Against Pests and Diseases
Bananas are susceptible to a variety of pests and diseases, including nematodes, banana weevils, and fungal infections. Regularly inspect your plants for indications of infestation or disease, and promptly take necessary measures to address any emerging issues.Consider using organic pest control methods whenever possible to minimize the use of chemical pesticides.
Harvesting Your Bananas
Knowing When to Harvest
Bananas usually require 9-12 months to mature and bear fruit. Harvesting time varies depending on the variety and environmental conditions. Look for signs that indicate your bananas are ready to be picked, such as changes in color and firmness.
Harvesting Techniques
To harvest your bananas, use a sharp knife to cut the fruit from the plant, leaving a portion of the stem attached. Handle the bananas with care to avoid bruising or damaging the delicate skin.
Enjoying the Fruits of Your Labor
Once harvested, your bananas can be enjoyed fresh or used in a variety of recipes. From smoothies and desserts to savory dishes and baked goods, there are countless ways to incorporate bananas into your culinary creations.
In conclusion, growing bananas in your garden can be a rewarding experience with the right knowledge and care. By following these tips and techniques, you can cultivate healthy banana plants and enjoy a plentiful harvest of delicious fruit.
Discover the remarkable synergy between two seemingly simple ingredients: orange and salt. Here’s how to harness their combined benefits.
Benefits of Orange and Salted Oranges
Oranges, known for their rich vitamin C content and antioxidant properties, also stimulate brain activity, aid digestion, and have a calming effect on stress and anxiety. Versatile beyond the kitchen, oranges are used in beauty care to rejuvenate skin and hair.
Salt, often underestimated, plays a crucial role beyond seasoning. It regulates blood pressure, transmits nerve impulses, and can even be used in home cleaning and wellness rituals. Himalayan pink salt, known for its purifying and detoxifying properties, is particularly valued for its mineral content and health benefits.
Creating a Powerful Orange-Salt Mixture
Combining orange with salt can revitalize your energy and inner vibrations. Here’s a simple way to create a mixture that harnesses the power of these ingredients:
Preparation:
Extract the juice from a fresh orange into a glass.
Add salt: Incorporate about two teaspoons of Himalayan salt, mixing well with the orange juice.
Uses of the Orange-Salt Mixture
This powerful mixture can be used in various ways to enhance your well-being and environment:
Relaxing Bath: Pour the mixture into your bathwater for a soothing and detoxifying soak.
Body Scrub: Use it as a scrub to rejuvenate your skin and eliminate negativity.
Natural Air Freshener: Place it in your living space to purify the air and remove negative energies.
For those applying the mixture directly to the skin, it is recommended to rinse afterward with water to remove negativity and any residual salt.
Adopt this straightforward ritual with orange and salt to harness your inner strength and transform your home environment.
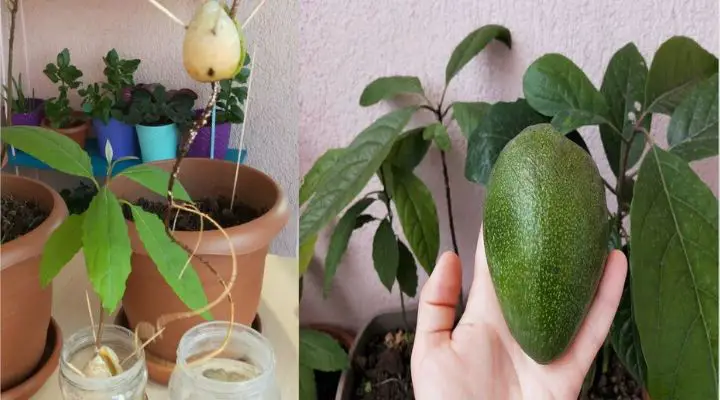
Growing an avocado in a pot at home is a rewarding experience. Not only do you get to enjoy fresh avocados, but you also have a beautiful plant to enhance your indoor space. This guide will take you through each stage of growing an avocado in a pot, from selecting the right variety to harvesting your delicious fruit.
Choosing the Right Avocado Variety
Why Variety Matters
Choosing the right avocado variety is crucial for successful growth. Some varieties are better suited to pot cultivation due to their smaller size and adaptability. The wrong variety might grow too large or require more space than a pot can provide.
Best Varieties for Pots
Some of the best avocado varieties for growing in pots include ‘Wurtz’, ‘Lamb Hass’, and ‘Little Cado’. These varieties are dwarf or semi-dwarf, making them ideal for container growth. They are more manageable and produce fruit that is just as tasty as their larger counterparts.
Preparing the Pot and Soil
Selecting the Right Pot
Choosing the right pot is essential for the health of your avocado plant. A pot with good drainage is crucial to prevent root rot. It should be at least 15-20 gallons in size to accommodate the growing roots. Materials like terracotta or plastic work well, but ensure there are enough drainage holes.
Ideal Soil Mix for Avocado Plants
Avocado plants thrive in well-draining soil. A mix of potting soil with sand or perlite ensures good drainage. Adding organic matter like compost can provide necessary nutrients. Avoid heavy soils that retain water, as they can cause root problems.
Planting the Avocado Seed or Seedling
Starting from Seed
Starting an avocado plant from a seed is a fun and educational process. Begin by removing the seed from a ripe avocado and cleaning it. Insert toothpicks into the seed and suspend it over a glass of water, with the bottom submerged. Place it in a warm, sunny spot and wait for it to sprout roots and a stem. This can take several weeks.
Transplanting a Seedling
If you prefer a quicker start, purchasing a young avocado seedling from a nursery is a great option. Transplant the seedling into your prepared pot, making sure to keep the root ball intact. Saturate the soil thoroughly and position it in a location awash with sunlight. Seedlings establish faster and can bear fruit sooner than those started from seed.
Caring for Your Potted Avocado Plant
Watering Requirements
Avocado plants need consistent watering but should not sit in waterlogged soil. When the top inch of soil seems dry, water it. While underwatering might result in foliage wilting, overwatering can cause root rot. Use a pot with drainage holes to help regulate moisture levels.
Sunlight and Temperature
Avocado plants love sunlight. Place your pot in a location where it receives at least 6-8 hours of direct sunlight daily. During colder months, ensure the plant is protected from frost by bringing it indoors or using a plant cover. Ideal temperatures range from 60-85°F.
Fertilizing and Pruning
When and How to Fertilize
Fertilizing your avocado plant helps promote healthy growth and fruit production. Every two to three months, apply a balanced, slow-release fertilizer. Alternatively, organic options like fish emulsion or compost tea can be applied more frequently. Be cautious not to over-fertilize, as this can damage the plant.
Pruning Tips for Healthy Growth
Your avocado plant’s size and form may be preserved via pruning. Remove dead or damaged branches and any growth that appears unhealthy. Prune in the spring or early summer to encourage new growth. Regular pruning ensures good air circulation and prevents diseases.
Dealing with Common Problems
Pests and Diseases
Avocado plants in pots can be susceptible to pests like spider mites, aphids, and scale insects. Regularly inspect your plant and use insecticidal soap or neem oil to treat infestations. Diseases like root rot can be avoided by ensuring proper drainage and not overwatering.
Yellowing Leaves and Other Issues
The presence of yellowing leaves may signify a range of problems, such as excessive watering, lack of nutrients, or infestation by pests. Check your watering schedule, inspect for pests, and consider a soil test to determine if additional nutrients are needed. Addressing these issues promptly will help keep your plant healthy.
Harvesting Your Avocados
Knowing When to Harvest
Avocados do not ripen on the tree. Once they reach maturity, you can pick them and let them ripen indoors. Mature avocados are typically darker in color and slightly soft to the touch. It can take several days to a week for them to ripen after picking.
Proper Harvesting Techniques
To harvest your avocados, use a sharp knife or pruning shears to cut the fruit from the tree, leaving a small stem attached. Handle the fruit gently to avoid bruising. Store them at room temperature until they soften. Once ripe, you can enjoy your home-grown avocados in various dishes.
By following these stages, you can successfully grow an avocado in a pot at home. Relish the journey and savor the rewards of your hard work!
Gardening is more than just a hobby; it’s a rewarding activity that brings you closer to nature and provides numerous benefits. Whether you’re growing flowers, vegetables, or herbs, there’s something incredibly satisfying about watching your plants thrive. But how do you ensure your garden flourishes? Let’s dive into seven amazing ways and tricks to grow plants successfully.
1. Choose the Right Plants for Your Climate
Understanding Your Hardiness Zone
Before you start planting, it’s crucial to know your hardiness zone. This zone indicates the climatic conditions of your area and helps you select plants that will thrive in your region. Check the USDA Hardiness Zone Map to determine your zone and choose plants accordingly.
Selecting Native Plants
Native plants are adapted to your local environment, making them easier to grow and maintain. They require less water, are more resistant to pests, and support local wildlife. Visit your local nursery or extension office to find out which native plants are suitable for your garden.
2. Prepare the Soil Properly
Soil Testing
Good soil is the cornerstone of a successful garden. Conduct a soil test to understand its composition and pH levels. This information will guide you in amending your soil to provide the best environment for your plants.
Adding Organic Matter
Incorporating organic matter like compost, manure, or leaf mold can significantly improve soil structure, fertility, and drainage. It also promotes beneficial microbial activity, which is essential for plant health.
Ensuring Proper Drainage
Poor drainage can lead to root rot and other plant diseases. If your soil is heavy and clay-like, consider adding sand or perlite to improve its drainage capabilities. Raised beds are another excellent solution for areas with poor drainage.
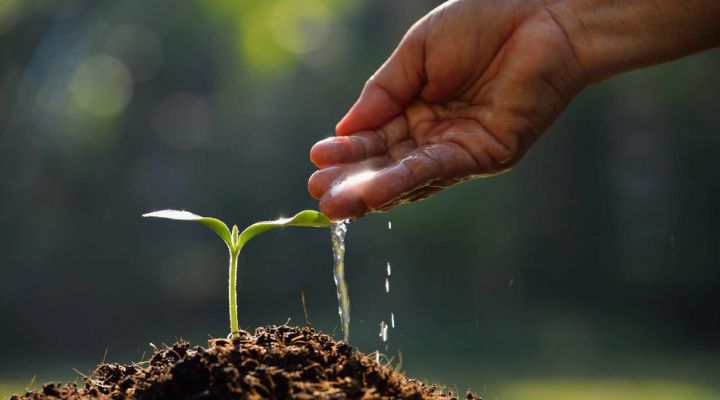
3. Watering Techniques
The Importance of Consistent Watering
Plants need consistent moisture to grow well. Too little water can stress plants, while too much can suffocate their roots. Establish a regular watering schedule that suits the needs of your plants and climate.
Watering Methods: Drip Irrigation, Soaker Hoses, and Hand Watering
Drip irrigation and soaker hoses are efficient watering methods that deliver water directly to the plant roots, reducing evaporation and runoff. Hand watering is also effective, especially for small gardens or potted plants. To promote deep root development, make sure you water well.
Best Times to Water Your Plants
Watering in the early morning or late afternoon is ideal as it reduces water loss due to evaporation and allows plants to absorb moisture before the heat of the day. Watering in the evening should be avoided as it might encourage fungus illnesses.
4. Use Mulch to Your Advantage
Types of Mulch
Mulch can be organic, like wood chips, straw, or grass clippings, or inorganic, like gravel or landscape fabric. Each type has its benefits and can be chosen based on your specific needs.
Benefits of Mulching
Mulch helps retain soil moisture, suppress weeds, regulate soil temperature, and add organic matter to the soil as it decomposes. It’s a simple yet effective way to improve your garden’s health.
How to Apply Mulch Correctly
Apply a 2-3 inch layer of mulch around your plants, ensuring you don’t pile it against the plant stems, which can cause rot. Replenish mulch as needed to maintain its effectiveness.
5. Prune Regularly
Why Pruning is Essential
Pruning promotes healthy growth, improves air circulation, and prevents diseases. It also helps shape the plants and encourages more blooms or fruit production.
Pruning Techniques for Different Plants
Different plants require different pruning techniques. For example, roses benefit from deadheading, while fruit trees need thinning cuts. Research the specific needs of your plants to prune them correctly.
Best Times to Prune
The best time to prune varies by plant species. Generally, prune flowering shrubs after they bloom, and prune deciduous trees and shrubs in late winter or early spring before new growth starts.
6. Combat Pests Naturally
Identifying Common Garden Pests
Aphids, slugs, and caterpillars are just a few common garden pests. Regularly inspect your plants for signs of pest damage, such as chewed leaves, discolored spots, or stunted growth.
Natural Pest Control Methods
Use natural pest control methods like neem oil, insecticidal soap, or diatomaceous earth to protect your plants. Introducing beneficial insects, like ladybugs and predatory nematodes, can also help control pest populations.
Companion Planting for Pest Control
Growing certain plants next to one other to ward against pests is known as companion planting. For example, marigolds can repel nematodes, while basil can ward off aphids. This method is a natural and effective way to protect your garden.
7. Utilize Composting
Benefits of Composting
Composting converts kitchen scraps and yard waste into nutrient-rich compost, which can improve soil fertility and structure. It’s an eco-friendly way to recycle organic waste and reduce landfill contributions.
How to Start a Compost Pile
Start by choosing a compost bin or creating a designated area in your yard. Combine green materials (like fruit scraps and grass clippings) with brown materials (like leaves and cardboard) in a 1:3 ratio. To promote faster decomposition and aeration, turn the pile frequently.
Using Compost in Your Garden
Utilize your compost to improve the soil in your garden once it’s ready. Apply it as a top dressing, mix it into planting beds, or use it to make compost tea. Your plants will benefit from the added nutrients and improved soil structure.
Conclusion
Gardening is a delightful and fulfilling activity that anyone can enjoy. By choosing the right plants, preparing the soil, watering correctly, using mulch, pruning, combating pests naturally, and utilizing composting, you can create a thriving garden. So, grab your gardening gloves and start growing!
FAQs
How often should I water my garden?
The kind of soil, plant requirements, and climate all affect how often you water. Generally, aim to water deeply once or twice a week, allowing the soil to dry slightly between watering.
What are the best plants for beginners?
Some easy-to-grow plants for beginners include tomatoes, lettuce, radishes, marigolds, and herbs like basil and mint.
How can I improve my soil quality?
Improving soil quality involves adding organic matter like compost, maintaining proper pH levels, and ensuring good drainage. Regular soil testing can help you make necessary adjustments.
What are some natural ways to get rid of garden pests?
Natural pest control methods include using neem oil, insecticidal soap, introducing beneficial insects, and practicing companion planting.
How do I know when to harvest my plants?
Harvesting times vary by plant. Generally, vegetables are ready when they reach their mature size and color. Herbs can be harvested as needed, and fruits are typically ripe when they are firm and have full color.
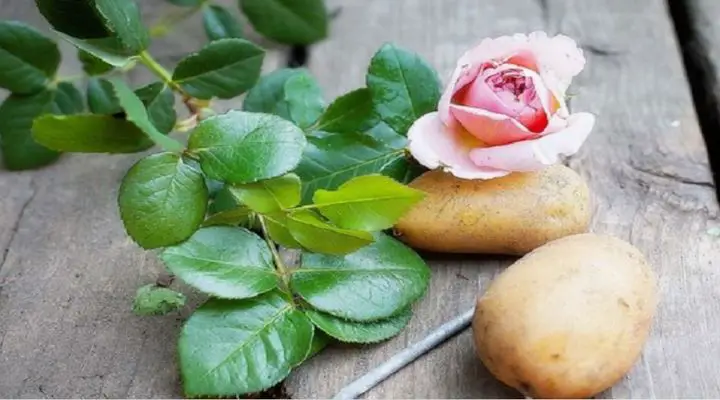
Growing roses can seem like a daunting task, but with a few tricks up your sleeve, you can cultivate beautiful blooms without much hassle. One such trick is propagating rose cuttings in a potato. Yes, you heard that right! This unique method has been gaining popularity among laidback gardeners for its simplicity and effectiveness.
Why Propagate Roses with Potatoes?
You might wonder, why use potatoes to propagate roses? The potato method offers several benefits that make it worth trying. Potatoes provide a moist and nutrient-rich environment, which is perfect for encouraging root growth. This technique is not only fun but also highly effective, especially for novice gardeners looking to expand their rose collection.
Materials Needed
Before diving into the process, gather the necessary materials:
Healthy rose cuttings
Medium-sized potatoes
Sharp knife
Hormone rooting powder
Potting soil
Plant pots or garden bed
Watering can
Optional materials that can improve success include a plastic bag or a mini greenhouse to maintain humidity.
Selecting the Right Rose Cuttings
The first step is to select the right rose cuttings. The best time to take cuttings is during late spring or early summer when the roses are actively growing. Choose healthy stems that are about 6-8 inches long, with at least three leaf nodes and a few leaves at the top.
Preparing the Rose Cuttings
Once you have your cuttings, it’s time to prepare them:
Trim the cutting just below a leaf node.
Remove the bottom leaves, leaving only a couple at the top.
Dip the cut end in hormone rooting powder to encourage root development.
Choosing the Right Potatoes
Not all potatoes are created equal for this purpose. Medium-sized potatoes with firm flesh work best. Avoid using potatoes that are too small or too large, as they may not provide the ideal environment for the cuttings.
Preparing the Potatoes
Prepare your potatoes by cutting them in half if they are too large. Make a hole in each potato half that is just large enough to insert the rose cutting. Ensure the hole is deep enough to support the cutting without it wobbling.
Inserting the Cuttings into Potatoes
Carefully insert the prepared rose cuttings into the holes in the potatoes. Make sure the cuttings are secure and standing upright. The potato will help keep the cutting moist and provide some nutrients as it begins to root.
Planting the Potato-Cutting Combo
Now that your cuttings are securely in the potatoes, it’s time to plant them. Choose a well-draining soil mix and plant the potato-cutting combo about 4-6 inches deep. Ensure the cuttings are buried enough to support them, but not so deep that they are completely covered.
Watering and Care
Water the newly planted cuttings thoroughly. Keep the soil consistently moist but not waterlogged. Place the pots or garden bed in a location with indirect sunlight. Maintaining the right balance of light and moisture is crucial for successful rooting.
Monitoring Growth
Over the next few weeks, monitor the cuttings for signs of growth. New leaves and shoots indicate successful rooting. If the cuttings appear wilted or show no signs of growth after a few weeks, they may not have taken root. Patience is key, as rooting can take anywhere from 2-4 weeks.
Transplanting to Permanent Location
Once the cuttings have developed a good root system, it’s time to transplant them to their permanent location. Choose a spot in your garden with well-draining soil and adequate sunlight. Carefully dig up the cuttings, ensuring you don’t damage the roots, and transplant them into their new home.
Caring for Newly Transplanted Roses
After transplanting, water the roses thoroughly and keep the soil consistently moist for the first few weeks. Fertilize with a balanced rose fertilizer to encourage healthy growth. Protect the new plants from pests and diseases by keeping an eye out for any signs of trouble.
Advantages of Using Potatoes for Rose Cuttings
Using potatoes for rose cuttings has several advantages. Potatoes help retain moisture around the cutting, reducing the risk of drying out. They also provide a source of nutrients that can boost the rooting process. This method is particularly useful in dry climates or for gardeners who struggle with maintaining consistent moisture levels.
Common Mistakes to Avoid
While the potato method is relatively simple, there are common mistakes to avoid:
Overwatering or underwatering: Finding the right balance of moisture is crucial.
Using the wrong type of soil or potato: Ensure you use well-draining soil and medium-sized, firm potatoes.
Improper cutting preparation: Always use healthy cuttings and apply rooting hormone to increase success rates.
Conclusion
Propagating roses in potatoes is a fun and effective way to grow new plants. This method leverages the natural moisture and nutrients of potatoes to create an ideal environment for root development. Whether you’re a novice or an experienced gardener, this laidback approach can yield beautiful results. So why not give it a try and expand your rose garden with minimal effort?
FAQs
Can I use any type of potato for rose cuttings? While most potatoes can work, medium-sized, firm potatoes are ideal. Avoid using overly small or large potatoes.
How long does it take for rose cuttings to root in potatoes? It typically takes 2-4 weeks for rose cuttings to root in potatoes, depending on the conditions.
Do I need to use rooting hormone? Using rooting hormone is recommended as it increases the chances of successful rooting, but it’s not absolutely necessary.
Can I grow other plants with this method? Yes, this method can be used for other types of plant cuttings that require similar rooting conditions.
What should I do if my cuttings don’t root? If your cuttings don’t root, review the steps to ensure you followed them correctly. Try adjusting the moisture levels or light conditions and attempt the process again.